Kayak Photography: A Summer Of Lessons and Mixed Results
- Andrew Adams
- Dec 5, 2020
- 6 min read
Updated: Jul 24, 2022

Kayak photography is physical and mental exercise... Managing current, conditions, and anxiety over dropping your gear in the water takes some getting used to.
I am very fortunate to live where there is easy access to rivers that meander through cedar swamps and abandoned 19th century ghost towns, kayak slips that allow you to explore the back bays where migrating sea birds layover on their seasonal journey, and where you can paddle to your own private beach on the Atlantic.
I have been kayaking off and on for the past 5 years, but this past summer I discovered that kayak photography can be one of the most rewarding ways to gain a greater appreciation for nature, and it comes with the added bonus of spreading awareness of how amazing the Mid-Atlantic can be for recreational opportunities as well as highlighting the ecological diversity of the outer costal plain.

In order to be successful at kayak photography- and to be clear my definition of success is not dropping my gear in the water- you must prepare, pack your patience, and lower your expectations of taking a great picture every time you go out.
I must stress kayaking and situational awareness should be your primary focus when you are on the water. It is good practice to take a safety course, familiarize yourself with reading USGS gauges and NOAA tide charts, learn how to read GPS and paper maps, to speak with park rangers where applicable, always check the weather and tell someone where you are going before you head out. A good rule of thumb for exploration is to paddle when the air temp + water temp is over 120 degrees. Otherwise additional cold weather preparations must be taken. Here is a great article highlighting what can happen to the human body at different temperatures and water conditions. Above all else, always wear your PFD, and when in doubt do not go out.

Additionally, do not underestimate the power of the sun and its ability to reflect off of the water. On longer paddles, I recommend a breathable baclava to cover your neck and face, a long sleeve UV shirt, and a wide brimmed sun-hat. These items can be dipped in the body of water you're paddling on for instant relief from the heat. It may look ridiculous but sun cancer is no joke, and the sun can zap you of your energy. You may think you can paddle 5 miles without issue, but the elements may put you in your place. It goes without saying to bring sunscreen and apply it often. I even go as far as wearing lightweight, light-colored convertible pants. When I want to swim or get some sun, I unzip the pants from the shorts, and I have instant swim shorts. Columbia P.F.G pants are great for this application. The lightweight pants also give me protection from bugs, which depending on the location and time of day may be a nuisance. I may not win any beauty contests, but I have found I am a more function over fashion kind of guy - and more often than not where I am paddling is desolate and the only ones to pass judgement are avian or reptilian in nature.
As for finding locations to paddle around you- there are a number of like minded people willing to give advice on Facebook, Reddit and other social media platforms. I've also explored places I've found using the Go Paddling App. Once you get out there you will find that most paddlers will help guide you and trade advice. It is a great way to meet people, network and find hidden gems. Out of respect of place most serious paddlers will not share locations online. Discovering these places on your own is half the fun. You will not find locations discussed directly on this blog.
Outside of normal paddling preparation, you have to prepare your gear for possible exposure to moisture. As a general rule, I only paddle with my camera out of the dry bag when I have an subject in mind, or can read where the tide, wind, or current is pushing me. More on this later. To keep my items dry, I carry 2 dry bags secured to the bulkhead of my kayak. I picked up an inexpensive dry bag from Walmart this summer for under $10.00. In there, I keep my cell phone, car keys, lunch, snacks ( grapes and oranges are great for quick energy and mouth watering purposes) and other necessities like bug spray and sunscreen. My photography equipment lives in Sea To Summit 5 L bag that I purchased from REI, but it looks like its available on Amazon too. As for what photography equipment I bring- I travel light - Only taking my camera body, 1 or 2 long lenses (with hoods for added splash protection) and cleaning gear. I find that taking landscape shots where the subject is fewer than 25 yards away is more suited for your cellphones camera.

As for tips on photographing- high shutter speeds and high ISO are your friends. Calm conditions and anchorage spots are never a guarantee, and notice there is no tripod on my kayak. There is a definite learning curve when 1st attempting taking pictures from your kayak. Your boat is essentially a bobbing raft, and ensuring you don't drift into a thicket, drift into a fast moving current, or careen and capsize while trying to focus on a fast moving bird or interesting land feature is an exercise for the senses. Bringing a camera up to your eye while your boat is pitching and rolling is an alien feeling to say the least. The only way to get used to it is to practice, and even then you never fully get used to the sensation as each day on the water is a different experience.
My recommendation is to start out by finding a stretch of water that is not subject to wind or other boat traffic. Again, it's always good practice to keep your gear in a dry bag until you're ready to shoot. A quick cautionary tale- my confidence got the better of this summer, and I tipped while my phone was out of my bag during lunch. Now I cannot charge my phone unless I use a wireless pad. Its a $300.00 mistake I am living with.
Once you get comfortable with the motion of the boat, and you've adjusted your center of gravity while looking through the eye piece its time to give you some tips on how I was able to take the pictures located in the gallery below. Whenever possible, I try to wedge\ anchor the stern or starboard side of my boat against the marsh. I do this

carefully as to not disturb the ecosystem. I am a firm believer and practitoioner of L-N-T ( leave no trace ) principles. As you can see in this video, I've positioned my boat away from the current and have found myself a nice calm spot to scan for wildlife or other interesting features to photograph.
In cases where anchorage or beaching your kayak is not advisable, I drop my paddle and drift as a way of taking stock of planning my next shot. By judging where the wind and tide \current is pushing you, you can position your boat between your subject and your safe zone. Looking at the video posted above, you can see if I were to drift in the channel I would be pushed into the reeds. Drifting will help you determine how much time you have to execute your shot, and will give you one less thing to worry about as your waiting for the heron, eagle, terrapin, or mud crab to give you the pose you are waiting for. Keep in mind, that shot may never happen, and often time you do not see hazards until you drift into your planned safe spot. This happened to me several times this summer as I kept one eye on my subject and one eye on my surroundings only to discover that safety cove I had planned drifting into was home to dozens of jellyfish, angry sand flies or putrid smelling bog mud.
The bottom line is, its best to explore before you dare bring out your expensive camera equipment.
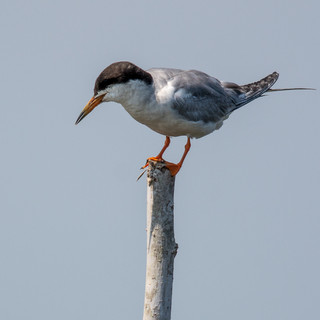
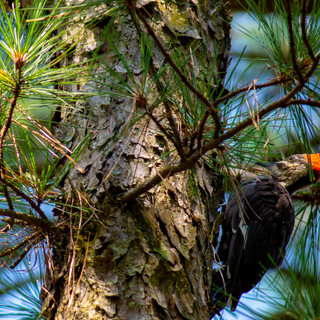
One last bit of advice from the naturalist in me. If you do venture out, please remind yourself you are subject to the elements, and no amount of planning can circumvent Mother Nature. Respect her, listen to your body, and above all else give the creatures you are photographing their space- many of these birds and reptiles frighten easily. I feel terrible when I paddle upon a sea bird whose just trying to exist and due to the current I keep pushing the bird further and further down the estuary. While funny, an egret angry bellow is something I try to avoid.
I hope this article was informative as you gain the skillset and confidence necessary to attempt kayak photography.


*Links in the article are meant to be informative, and in no way constitute an endorsement. I do not receive payment or consideration from the links sited.


Comments